
Intro
You don’t need me to tell you how dangerous and destructive ransomware is. It seems like every week there is a new headline, with the same story: an organization was hit by ransomware, disrupting their operations, and causing plenty of monetary and personal loss through downtime, damage to the company brand, and individuals losing their jobs.
It’s also no secret that more and more ransomware groups are using the free and open source version of BloodHound as part of their lateral movement suite. When ransomware operators use BloodHound, they often gain better clarity of the Active Directory structure than even the AD admins have, and discover attack paths leading them to full control of the enterprise. But for many AD admins, using BloodHound to find and eliminate those same attack paths is becoming more common.
Recently, the United States Department of Homeland Security, along with PricewaterhouseCoopers both recommended organizations do exactly that: use BloodHound to proactively mitigate or eliminate the most critical attack paths before an adversary can discover those same attack paths and take over the enterprise. While the free and open source version of BloodHound was originally designed for offense, defenders can still achieve very quick and effective wins using the free version.
In this blog post, I will describe how you can use the free and open source of BloodHound to determine how big your attack path problem is, and some quick and big wins you can gain to mitigate and eliminate some of the most critical attack paths.
Do you have Attack Paths? If so, how bad are they?
If your organization has been running Active Directory for more than a few months, it is virtually guaranteed that there are thousands, millions, even billions of attack paths in your environment. Once you have BloodHound installed and have performed some data collection, you’re ready to explore the data using the BloodHound GUI.
Note: BloodHound is free and open source software. You can audit all the code for BloodHound and SharpHound here.
The absolute fastest way to see just how big of an attack path problem you have is to use BloodHound’s pathfinding feature to find attack paths from all-inclusive security groups to the most critical principals in AD. For example, if we look at the example dataset and search for attack paths from the Domain Users group to the Domain Admins group, we get this result:
In this example, the Domain Users group has been added to the Administrators group, which has control of the Domain Admins group. This forms an attack path from the Domain Users group to the Domain Admins group, and allows anyone in the domain to escalate to Domain Admin by following this attack path. In other words, if anyone in the enterprise is compromised, the adversary is guaranteed to be able to achieve Domain Admin level rights.
There are other very highly privileged groups you should target as well. For example, let’s see happens if we look for attack paths from Domain Users to Domain Controllers:
Or from Domain Users to the domain head object:
These are all worst-case scenarios. In your own dataset, you might see more complex attack paths, like this one for example from a real Active Directory environment:
Keep in mind that BloodHound is showing us the shortest attack paths, not all attack paths. At this point we are just determining the size of the problem.
It can be tempting to see these attack paths and start working on making changes, but you’ll wind up chasing your tail because the graph is monstrously complex — we’re only seeing the very tip of the iceberg at this point.
Don’t see any paths when doing these searches? Try searches that start from one of the “Origin” principals and end at one of the “Target” principals in this table:https://posts.specterops.io/media/6233073d71fccc372e1b6b63a1da9bce
Don’t just stick to what’s shown in those rows: try searches between “Domain Users” and “Administrators”, “Domain Computers” to “Domain Admins”, etc.
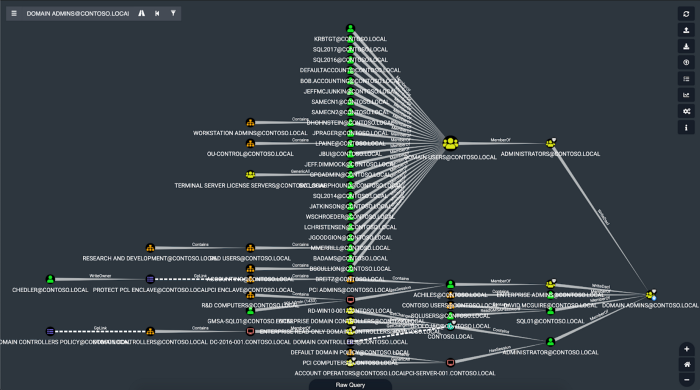
Still don’t see any results? You might get away with just finding all shortest paths to the Domain Admins group. To do this, search for the Domain Admins group, then right click it, and click “Shortest Paths to Here”:
In the example dataset, the result looks like this:
Be forewarned: if there are several thousand attack paths, the free BloodHound GUI may not be able to render them. This is why it’s much better to do targeted searches first before trying to render all shortest attack paths to a particular node. That targeted analysis is detailed below.
Proactive Auditing and Analysis
By now you may have an idea of how bad the attack path problem is in your own environment. So what can we do about it? Let’s break up our proactive analysis into three steps:
Proactive Step 1: Audit permissions against highly sensitive principals
Several principals in Active Directory can provide Domain Admin-equivalent level of privilege. Using BloodHound, we can very easily determine precisely who has control of any of those principals with intuitive and easy-to-understand visuals.
For example, let’s bring up the Domain Admins group in the test data set, click the group, and look at the “Inbound Object Control” section of the node analysis tab:
We can see there are 2 “Explicit Object Controllers”. Click this row and you’ll see what they are:
No surprise here: the Administrators and Enterprise Admins groups both have control of the Domain Admins group. This is by design and should not be changed. But what about the item under “Explicit Object Controllers”? If we click “Unrolled Object Controllers”, BloodHound will show us who all has these privileges via security group delegation:
This gives us the real picture of everyone that has control of the Domain Admins group, and it’s here where we can see a big problem that we saw before: the Domain Users group has been added to the Administrators group.
In your own data set, it’s here where you’ll be able to clearly see the full picture of what controls the most sensitive objects. If you see a group nesting or group membership that doesn’t make sense, you should invest the time and effort into removing that membership or privilege to reduce the exposure of the highly privileged principal.
Note: Unlike finding shortest paths, BloodHound is showing us the full picture of who has control of this object. There is no tail chasing here. It’s through this auditing process where you should start creating remediation tasks.
You should repeat this process for the following principals:https://posts.specterops.io/media/3378d18b3850c93b778a2fa471f910bd
You should also repeat this process for any other custom, high value principal specific to your environment, such as a custom server admins or workstation admins security group.
Proactive Step 2: Audit privileged user behaviors
Whenever a user performs an interactive logon onto a Windows computer, several mechanisms in the operating system enable an attacker with control of that computer to assume the identity of the user. This could mean the attacker gains access to the user’s plaintext password, or it could mean the attacker can impersonate the user by abusing the Windows access token model.
Even with host-based security controls that are meant to stop an attacker from impersonating other users logged onto the system, an attacker with control of the system can usually impersonate other users anyway, either by temporarily altering local system security policies, or by very simply disabling the host-based security control.
So what’s the bottom line here? The bottom line is this: whenever a privileged user logs onto another system using an interactive (or otherwise abusable) logon, the administrators of that computer gain the ability to impersonate that user. Using BloodHound, we can easily audit the behavior of the most highly privileged users and spot any particularly dangerous logons.
This process is pretty simple. First, find the Domain Admins group using the BloodHound GUI. Click the group, and look at the node info tab. At the top you’ll see an item for “Sessions”. These are the abusable logon sessions that SharpHound observed during data collection:
Click on this line to have BloodHound show you the computers that users of this group have logged onto. In the example database, this looks like this:
We can see that the PCI-SERVER-001 computer has a session for the Administrator user. In the next section we’ll look at how to assess the impact of this abusable logon, but for now let’s ask this question:
Should a Domain Admin be logging on to a PCI server?
In accordance with the tiered administration model: no. For now, let’s focus on seeing where privileged users are logging in.
Let’s take a look at a real-world example now. In our real dataset from a real customer environment, when we click on “Sessions” for the Domain Admins group, we see this:
Each one of those computer nodes is now an opportunity for an attacker to take control of a Domain Admin account. Inspect the names of these systems and see if you can find any systems that a Domain Admin should not be logging onto. In general, Domain Admins should only ever log onto Domain Controllers or Privileged Access Workstations (PAWS), or other systems that are designated as being part of Tier Zero. In the next section, let’s see how we can audit the local admin rights on each of those systems.
You should repeat this process for the following security groups:https://posts.specterops.io/media/2249d17f9aabae13df40943ed34f6e56
Proactive Step 3: Audit local groups and object permissions on highly sensitive computers
In the last section we looked at how to determine which systems highly privileged users were logging onto. Now, let’s look at how to audit the permissions against those systems, as well as the permissions against other very highly sensitive computers.
Looking first at systems that highly privileged users log onto, let’s look at the two examples from the previous section first. First, let’s see who the admins are on the PCI-SERVER-001 computer by clicking the computer, then inspecting the “Local Admins” section of the node info tab:
Click on the line that says “Unrolled Admins” and you will see all the admins on that computer. “Unrolled Admin” means any user or other type of principal that has admin rights on the computer through any level of security group nesting:
In this instance, the only local admins on this computer are other Domain Admins. That means that by abusing local admin rights on this computer, only another Domain Admin can take over our Administrator user for this particular abusable logon.
In our real world example, we had many more computers to choose from. Selecting one of those systems at random and clicking the “Unrolled Admins” list item again, we see this:
Now it’s not just the other Domain Admins who have the ability to control this account, but all 385 users with admin rights on that one computer as well.
We can audit these permissions for highly sensitive computers as well. For example, let’s search for the Domain Controllers group in the BloodHound GUI, then click the group and inspect the “Unrolled Members” line:
Click this line and you will see the Domain Controller computers in the graph:
Now, let’s click the Domain Controller node, then look at the “Local Admins” section for that computer:
In this section, we can see that there are 28 “Unrolled Admins” on this computer. By clicking this line we can see how this works out visually:
Here we see a big problem: the Domain Users group has been granted local admin rights on the domain controller — a dangerous configuration that is unfortunately somewhat common in the real world.
In a real environment, the results here can look a little more like this (this is a real domain controller):
Out-of-control security group nesting has led to a Domain Controller with 1,872 local admin users: a dangerous situation for the enterprise, and a potentially easy target for an attacker.
As a defender, you can use this audit capability to easily understand the real effect of abusable permissions against the most sensitive computers in your environment, and identify permissions and security group nestings that should be removed.
You should repeat this process for computers that belong to the following security groups:https://posts.specterops.io/media/bd7202da358399a663b7035a773d69e3
You should also repeat this process for any computers that serve as root certificate authorities in your domain.
Conclusion
Ransomware is getting more dangerous over time, and ransomware operators are continuing to abuse the highly complex nature of Active Directory to find and execute attack paths in order to take full control of the enterprise before deploying ransomware to most or all domain-joined systems. Defenders can use the free version of BloodHound to understand their exposure to attack paths, audit the most highly sensitive objects in Active Directory, and execute targeted remediations that can help remove or mitigate the most dangerous attack paths before an attacker can find and exploit those same attack paths.
Get BloodHound for free here: https://github.com/BloodHoundAD
Read the BloodHound documentation here: https://bloodhound.readthedocs.io/en/latest/
Join the BloodHound Slack here: http://bloodhoundgang.herokuapp.com/
Thank you Matt Hand, Will, Justin Kohler, Duane MichaelDuane Michael
Adversary Simulation @specterops, USMC Veteran, Australian Shepherd x2 Dad, Outdoor Adventurer, Heavy Metal Connoisseur, Epic Fantasy/Classic SciFi Bibliophile.Follow, Andrew Chiles and Nick Powers for reviewing this post.